Thursday, December 27, 2012

White Chocolate Peppermint Bark Cheesecake

When I first made peppermint bark this year and found this recipe in the suggested section there was no way I couldn't make it. I love cheesecake. Its seriously my favourite dessert.

We got invited to a Christmas party/potluck. As my boyfriend takes it upon himself to brag about my baking I got sucked into bringing two things. My Jalapeno Cheese Buns as well as this. They were both well received and needless to say none came home with me. I did make sure I was first in line for one of each so I at least got to enjoy it myself. This cheesecake does take some time compared to some others I've made but it was worth it for sure.

I attempted this again in mini size and I didn't even think to adjust the cooking time - down to 35/40 minutes is recommended. It'll make 12 of the mini size. When I made it the second time I added a touch less peppermint extract. That was just my personal preference.

With all that said, here's the recipe and photo!

*If you need some extra clarification, there's some great photos at many of the steps on the original site.

White Chocolate Peppermint Bark Cheesecake
(Adapted slightly from Baked By Rachel)

Crust Ingredients:

2C chocolate cookie crumbs (or 22 regular oreos with filling – not double stuffed)
3 tbsp butter, melted

Filling Ingredients:

3 – 8oz containers or blocks cream cheese, softened
1C sugar
4oz white chocolate, melted
1 1/2 tbsp flour
1 1/2 tbsp heavy cream
1/4 tsp salt
2 tsp peppermint extract
3 eggs
1/2 batch peppermint bark, made thin or roughly 1 1/2C chunks

Mousse Ingredients:

1/2C cool whip, softened
4oz cream cheese, softened
2 oz white chocolate, melted
1 1/2 tbsp sugar
1/2 tsp vanilla

Decoration:

2 oz Cream Cheese
1 Cup Cool Whip
1 tsp Vanilla
1 Tbsp Vanilla
Peppermint snow
Grated chocolate


____________________________________________________-

Preheat oven to 350 degrees. Prepare a 10″ spring-form pan with two sheets of tin foil. In a food processor, blend cookies until only fine crumbs remain. Add melted butter. Give a quick blend. Transfer crumb mixture to spring-form pan. Shake to disperse crumbs. Using a flat bottom cup, press down to create an even crust. Bake crust for 10 minutes. Set aside.

Reduce temperature to 325 degrees.

Cut up peppermint bark into small pieces. Set aside.

Begin melting 4oz white chocolate. Using the microwave, in a heat safe bowl microwave for 30 seconds at 50% power until fully melted. Stir well after each interval.

In stand mixer, beat cream cheese until smooth. Add sugar. Mix well. Scrape bowl well prior to each new addition and as needed. Add melted chocolate, flour, whipping cream, salt and peppermint extract. Mix well. On medium/low speed, add one egg at a time. Mix until smooth and blended well.

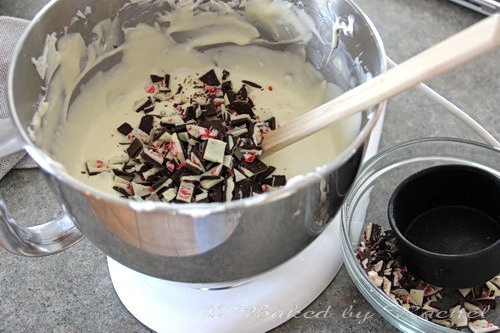
Add peppermint bark pieces, stir by hand.

Transfer spring-form pan and cooked crust into a larger pan, such as a large roasting pan.

Pour filling into crust. Add enough hot water to reach half way up the sides of your spring-form pan. Carefully place in center of oven. Bake at 325 degrees for 1 hour. Turn off the oven. Keeping the door shut, leave the cheesecake in the oven for an additional 45 minutes. Remove and allow to sit for at least 1 hour before chilling.

Chill 4 hours or overnight before adding the mousse.

In a medium bowl beat softened cream cheese, melted white chocolate, cool whip, sugar and vanilla until smooth and slightly thickened.

Carefully remove side of spring-form pan. Spread mousse mixture evenly over cheesecake. Chill for 4 hours or overnight before serving.

I also made a little topping dollop for each slice to help with division. To do this, Mix the first 4 ingredients (2 oz Cream Cheese, 1 Cup Cool Whip, 1 tsp Vanilla and 1 Tbsp Vanilla) quickly with a hand mixer or stand mixer until well combined. Mixture should still be fairly close to the consistency of cream cheese. I then piped this around the outside of the cake in even dollops. See photo.

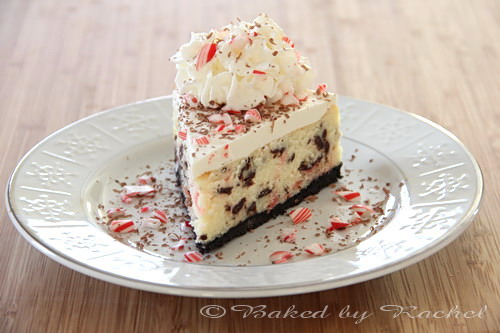
Serve slices with chocolate shavings, crushed peppermint candies and whipped cream.
Store covered in the refrigerator.


Chocolate Pecan Caramel Candy Bars

The last of the three recipes we chose for our crazy baking day! This one has the longest name and was probably my favourite. It was a little more intense than the others to make but it will definitely be on my Christmas Baking list for next year.

To make it a bit easier to get out of the pan, we actually used Crisco to grease the foil. There was no way anything was sticking to that! The only other thing I would say with this recipe is that it would probably be easier to make it twice instead of doubling it.

Here`s the recipe and flashcard picture!

1 1/2 Cups AP Flour
1/2 Cup Firmly Packed Brown Sugar
1/2 Cup Unsalted Butter

Topping:

6 Tbsp Unsalted Butter
1 Cup Brown Sugar - Firmly packed
3 Tbsp Honey
3 Tbsp Heavy Cream
2 Tbsp Maple Syrup
1 1/2 Cups Chopped Pecans or Walnuts (We chose Pecans)
1/2 Cup Chocolate Chips

Preheat oven to 350ºF, Line a 9x13" baking pan with foil and grease foil (we used crisco for greasing).

To make crust, combine flour, sugar, butter and mix until crumbly. You can do this in a food processor a mixer or even by hand. Pat into the bottom of the pan (on foil). Bake for 12 minutes or until set. Remove and cool the pan on a rack.

To make topping, in a sauce pan, heat butter until it melts and bubbles. Add brown sugar, honey, cream and syrup and bring to a boil over medium heat while stirring constantly. Let boil without stirring for 1 minute. Pour over the hot/warm crust and sprinkle with nuts. Bake for 12 - 15 minutes or until caramel layer is bubbly. Remove from oven and sprinkle with chocolate chips. Let melt, then swirl with a spatula. Let cool and peel off foil. Makes about 3dz 1 - 2 inch squares.

Ours turned out a bit thicker than the picture but they were a great consistency through out.


Swirled Peanut Butter Bars

I'll be honest, I don't like peanut butter. I mean in a classic PB&J or spiced up for a Thai sauce, I'm in. But standard peanut butter things, I'm not overly into. But this was another one of the recipes we picked for our Pre Christmas baking spree.

We doubled this one for two 9x13" pans. They turned out really good, maybe a little rich tasting for me - but every peanut butter fan I know liked them. These probably won't make my Christmas baking list, but don't let that stop you. Because if it sounds up your alley - it probably is and it turned out great and was easy.

Here's the recipe and flashcard picture!

1/2 Cup Room Temperature Butter
1/2 Cup Sugar
1/2 Cup Brown Sugar Firmly Packed
1 Egg
1/3 Cup Creamy Peanut Butter
1 Cup AP Flour
1 Cup Quick Cooking Oats
1/2 Tsp Baking Soda
1/4 Tsp salt

Icing

1 Cup Icing Sugar
1/2 Cup Peanut Butter
3-4 Tbsp Heavy Cream (We used about 10 tbsp for a double recipe)
2 Cups Chocolate Chips

Preheat Oven to 350ºF. Lightly grease a 9x13" baking pan. Cream together butter and sugars until light. Add egg and peanut butter and mix until blended. In another bowl mix together the flour, oats, baking soda and salt. Add to butter mixture and mix until blended. Pat into prepared pan.

Bake for 20 - 25 minutes or until lightly browned.

Icing:

Stir together sugar, peanut butter and enough heavy cream to form a runny mixture (Ours never really got "runny" but it got thinner).

Remove baked bars from oven and sprinkle with chocolate chips, let melt for a couple minutes. Drizzle or spoon peanut butter mixture over the chocolate and swirl with a spoon or butter knife. Let cook on a rack. Makes about 4dz 1 - 2 inch squares.

Here's the flashcard picture - ours looked almost identical.

Frosty Snowmen

My friend and I decided to band together and bake our faces off for a whole day, pre Christmas. She had this really awesome flashcard deck of Cookies, Bars and the like so we picked out 3 recipes to take down in our day.

This is the only one we didn't double to share, they turned out great.I had to add ALOT more liquid to the glaze to make it glaze like. But that was all. Really could have been because of our wonderful dry weather here in Calgary. We also had a bit of trouble with the dough tearing while we were rolling it out. Overall though, I will be adding these to my Christmas list of baking for years to come.

I found a similar sized snowman cutter and used peppermint snow for the buttons, as we found out that the nutty club went out of business and no longer sells those cute little silver button balls anymore! I did find a few at my out of town IGA, I may have bought more than I'll use. Ever. (But they're Mine) You could also use any other shapes holiday themed or not!

Here's the recipe and the picture on the back of the flashcard:

1 Cup Icing Sugar
1 Cup Unsalted Butter
1 Egg Yolk
2 Tsp Grated lemon zest (I'd use organic, since you're zesting)
2 1/4 Cups AP Flour
1/4 Tsp Salt

Glaze:
2 Cups Icing Sugar
2 Tbsp Fresh Lemon Juice
1 Tbsp Chambord (or other raspberry liquor)

In a bowl cream together sugar, butter, egg yolk and lemon zest until light in colour and smooth. Add flour and salt and mix to form a dough. Shape into a ball, wrap in plastic wrap and chill until firm.

Preheat oven to 375ºF. On a lightly floured surface roll out dough about 1/16 of an inch thick. Using a 2.5 inch snowman cookie cutter, cut out cookies. Place on greased baking sheets. Bake for 8-10 minutes or until lightly browned around edges. (Mine took 9 minutes in a regular, non convection oven.) Transfer to racks to cool. *We got 80 cookies with a 3.5 inch cookie cutter.

To make glaze, in a bowl whisk together sugar, lemon juice and chambord to make a thin, transparent coating. Spread on cookies.

*I probably used about another 3 Tbsp of liquid, half lemon juice and half chambord. This made way more glaze than we needed (but that's ok) and it did come out a light peachy pink colour. I used an offset spatula to spread it, worked great.


Tuesday, November 13, 2012

Peppermint Bark

I really wanted to try making this popular Christmas treat myself. At Williams Sonoma, it's $39 a pound. Don't get me wrong, its good. But for me, that's a little steep and I just couldn't see it being that hard.

I found a recipe and a really cute idea from one of the food bloggers I follow. My blog isn't awesome enough (yet) to be able to do give away's, but maybe one day. I couldn't find the silicone mold that she used in hers but I did find Lollipop Molds that worked great. More later. I don't think it could have been much easier to make this.

I made 2 batches. One batch I used Wilton Candy Melts in a vanilla chocolate mint flavour, with candy cane pieces in it already. In the other batch I used regular white baking chocolate and just flavoured it with the peppermint oil and sprinkled some crushed up candy canes on top before it hardened. I used Williams Sonoma Peppermint Snow. But only because I had some. Candycanes are just fine. In both batches I used Semi-Sweet baking chocolate for the darker layer flavoured with the peppermint oil.

The batch that I made with the Wilton melts I put into candy molds. Soo cute its almost lame. I'm more thinking for Christmas gifts or trays with those. Spoiler alert for all my friends reading this. This is what you get. The molds and the melts were pretty cheap at Michaels, both $4 each. Well 2 molds/$4. And since we all know Michaels sends out coupons every week you can definitely save some money on them. They also had some really great gift boxes and tins.

For the second batch I just smeared it pretty thin on a parchment lined cookie sheet. I did the dark chocolate and let it sit for about 15 minutes in the fridge before I did the white chocolate on top. Sprinkled with some Williams Sonoma Peppermint snow. There's a chance that I may never stop making this now. I've also seen some really great variations on Martha Stewart's Site.

*I've been having some trouble with links getting reused on some of the bigger sites, so I thought that I would start putting the recipe within my site as well as the link. Just in case.

Peppermint Bark & Shapes
(Adapted from Peppermint Bark)
Makes 3 lollipop molds

4oz chocolate of your choice (I used Semi Sweet)
4oz white chocolate
1/2 tsp Vegetable Oil
1/8 tsp Peppermint Extract for White Chocolate
1/8 tsp Peppermint Extract for Semi Sweet Chocolate
Crushed candy canes or peppermint candies. Powder removed*

*To remove powder, crush candy over a fine mesh strainer. Shake gently until all powder is removed.

If you want to use the wilton candy melts like I did you don't have to add the oil or the peppermint extract to the White chocolate. Its also super handy in that you can just put all of the melts into a disposable decorating bag and melt in the microwave. This is especially good for the shapes as it makes it easier to get into the corners.

__________________________


In a small to medium sized measuring cup or bowl (I like one with a pouring spout) add milk or dark chocolate and 1/2 tsp vegetable oil. Melt in the microwave in 30 second intervals at 50% power. Stir well after each 30 seconds. When fully melted, add 1/8 tsp peppermint extract. Stir well.
(I also did this with a double boiler, the microwave method is probably a better choice, unless you're doing alot. A double boiler was messy and took a lot longer.)
Pour chocolate evenly among mold cavities, filling no more than half full. Chill for at least 10 minutes.
Repeat process with white chocolate. Remove from molds after fully hardened. Store in the fridge.
__________________________

I doubled this recipe for 6 molds, plus had a little extra to do some plain "bark" style. To do this I simply poured the chocolate on a parchment lined baking sheet, let set for a few minutes and then poured the white chocolate on top. Sprinkled with my peppermint snow and put in the fridge. After about 2 hours I broke it apart into about 2 inch pieces. 


Southwestern Sloppy Joes

This recipe caught my eye on one of the weekly emails I get. I usually scroll through and delete them pretty much right away. The link on this one was broken and I still went on a search to find it. As I've made no secret of, I enjoy spicy food. As long as its a nice, well flavoured dish.

Sloppy joes are super easy to make yourself and although that manwich sauce is pretty tasty and even easier, this is a good way to make sure you're eating what you want to eat. Control the salt and the spice and even the meat type. We were going to make these with ground dark meat turkey but when Sean got to the grocery store he texted me to ask if we could have them with bison. Bison is probably my favourite meat when it comes to burgers anyways so why not? It's pretty much on par with the nutrients/fat/calories in turkey with substantially more flavour.

Other than the bison meat change we found we needed a bit more of the passata to make it "Sloppy". We also found this made waaay more than 4 servings. So far we've gotten 8 and there's probably at least 4 more left. This will depend on how much you put on each bun though.

Here's the recipe adapted slightly with how we made it.

Southwestern Sloppy Joes
(Adapted from Canadian Living)


1 tbsp (15 mL) olive oil
1 onion, diced
1 jalapeño pepper
2 cloves garlic, grated or minced 
1 lb (454 g) lean ground bison (Or beef)
2 tsp (10 mL) chili powder
1-1/2 tsp (7 mL) ground cumin
1-1/2 tsp (7 mL) ground coriander
1 pinch salt
1 pinch pepper
1 pinch cayenne 
1-1/2 Cup (375 mL) bottled strained tomatoes, (passata)
1 can rinsed drained black beans
1/2 cup (125 mL) frozen corn kernels
2 tbsp (30 mL) lime juice
2 tsp (10 mL) liquid honey
Hamburger Buns
Shredded cheese

In large skillet, heat oil over medium heat; cook onion, jalapeño pepper and garlic, stirring occasionally, until softened, 6 to 8 minutes.

Add bison; cook over medium-high heat, breaking up with spoon, until browned, about 5 minutes.


Add spices; cook for 1 minute or until fragrant. Add tomatoes, beans, corn, lime juice and honey; cook until slightly thickened, 5-10 minutes. 


In the meantime, if you'd like, toast your buns. I recommend this to keep the integrity (somewhat) of your Sloppy Joe. Otherwise that bun will be a soggy mess in no time!

Divide evenly among bottoms of buns; sprinkle with cheese. Cover with tops of buns or leave open face for a higher meat to bun ratio.


Monday, November 12, 2012

Fiesta Chicken and Rice

I've recently been trying some different recipes that may get me to enjoy chicken a little more. It's not bad or anything, I think I just had way too much of it as a child and it was all just so dry. I saw this recipe and I was interested right away. I would recommend adding black beans for some extra filling and maybe some hot sauce to liven it up a bit. I don't really thing the cheese adds anything but calories (and that's not something you will hear me say very often) so feel free to leave it out.

I'd definitely make this again.I have a 12 inch skillet and I didn't use it, I have a 3qt Braiser that I used instead. It has a lid and I think its great for one pot type dinners.

Fiesta Chicken and Rice
(Adapted slightly from Here)

Ingredients:

4 boneless, skinless chicken breasts
Salt and Pepper
3 Tbsp Grapeseed oil
2 cups long-grain rice
1 medium onion, chopped
4 garlic cloves, minced
1 teaspoon dried oregano
1 teaspoon chili powder
1/8 teaspoon cayenne pepper
1/2 teaspoon paprika
1 14.5-oz can diced tomatoes
1 red bell pepper, chopped medium
1 3/4 cups low-sodium chicken broth
1 cup shredded Cheddar cheese

Directions:

1. Season both sides of the chicken with salt and pepper.

2. Set a large skillet or braiser over medium-high heat and add the oil. When it starts to warm, after 3 minutes or so, add the chicken and cook on one side until golden brown, about 6 minutes. Take the chicken out, leaving the fat in the pan.

3. Add the rice and onion to the pan. Cook while stirring to avoid it burning on the bottom, until the rice is toasted and the onions begin to soften, about 3 minutes. Add the garlic and spices and cook for 15 seconds or so to bring out the flavours in the spices.

4. Mix in the tomatoes, red pepper and chicken broth. Bring the mixture to a boil, scraping up any browned bits from the bottom of the pan. Add the chicken back to the pan, browned side up. Cover the pan and reduce the heat to low. Cook until the chicken is cooked through, about 12 minutes.

5. Transfer the chicken to a cutting board and stir the rice and replace the cover and continue cooking until the rice is tender and the liquid is absorbed, about 5-10 minutes, depending on your rice. Meanwhile, cut the chicken into slices.

6. Turn the heat off the pan and arrange the sliced chicken on top. Sprinkle with the cheese and cover the pan again and let stand for a few minutes until the cheese has melted.

7. Serves 6-8