For my birthday I got a mini cheesecake pan (which is exciting in so many ways!) I was dying to use it. It was my friend Briana's Birthday and I wanted everything I brought to say "Bri". I topped these with some Jalapeño Jam we had made in the summer. Theses were pretty easy to throw together and I actually made them at the same time as the cupcakes with Strawberry Rhubarb frosting. This is an original recipe I came up with, just for Bri!
Savoury Cheesecakes
Ingredients:
8 oz or 1 package light cream cheese
1 package Boursin cheese - Any flavour, I used Herb and Garlic
6 Breton Vegetable Crackers - Any good quality cracker will work here
1 Egg White
1/2 Cup Jalapeño Jelly
Directions:
Preheat Oven to 300ºF
Put crackers in food processor to crumble evenly, once they are just crumbs pour in egg white to help them clump together. Divide and spoon into the bottom of the 12 wells of the mini cheesecake pan (a mini muffin pan would probably also work for this recipe, you may want to line them). Place in heated oven for about 10 minutes or until crisp and come out looking like new little crackers.
Meanwhile, mix cream cheese and boursin cheese together in a bowl.
Once the bottoms come out of the oven, start placing spoonfuls into the wells on top. The heat will help the cheese to form to the cracker bottom and hold it all together. I used a mini "ice cream" type scoop and pressed the cheese mixture into each one until they were all fairly even.
Remove from the pan once cooled and top with Jalapeño Jelly.
Makes 12 mini cheesecakes. I didn't get a picture of these ones, but that way you can make them until they look good to you!
Thursday, January 2, 2014
Vanilla Cupcakes with Peppermint Swirl Frosting
I'm a bit late on these as I made them for a party we went to just before Christmas. They turned out really cute and festive, in part I think because I made the icing look swirled like peppermint so that people would know what they were getting into. They were a bit heavy to me overall. I found the cake to be a little dense and the icing to be thick and very peppermint-y. I would definitely still make them again, just with a few changes. I found this recipe through Baked By Rachel which is an awesome blog, I follow on Twitter and Pinterest. Her pictures are amazing and get me every time.
On with the cupcakes!
Ingredients:
Cupcakes:
4 Tbsp unsalted butter, softened
1/2 Cup granulated sugar
1/2 tsp vanilla paste
2 egg whites
1/4 tsp salt
3/4 tsp baking powder
1/4 Cup skim milk (Or whatever you have!)
3/4 Cup Cake and Pastry flour (AP should work too, sifted)
Buttercream:
3 Tbsp unsalted butter, softened
1.5 Cups icing sugar
1/2 tsp peppermint extract (or less if you choose)
4-6 Tbsp water
Directions:
Preheat oven to 350°F. Line a mini muffin/cupcake pan with 20 liners. Thats how many I got out the recipe, you could get plus or minus a couple
Cream together butter and sugar to start the cupcakes. Add vanilla paste and egg whites. Process until the batter is no longer lumpy and add remaining dry ingredients, with the milk last.
Mix until ingredients are just combined. Divide among liners, roughly 3/4 full, I found a mini (ice cream type) scoop works well for this size of cupcake to keep them all pretty even.
Bake for 13-15 minutes (in my non convection oven) on the middle rack or until a toothpick comes out clean. Let cool in tins for a few minutes before transferring to a wire rack to cool completely.
While cupcakes are cooking, beat together softened butter, icing sugar and peppermint extract. Add 2-3 tbsp of the water, to help keep the icing sugar from going everywhere when you start mixing.
Slowly add more water until a thick but still spreadable consistency is reached, depending how you plan to frost your cupcakes.
Cover well until ready to use.
Wait until cooled completely to frost. I used a small round tip and created the stripes in my frosting by placing red food colouring in stripes upward from the tip of my bag, so the icing would dye as it came out.
I would recommend a disposable bag for this as it will more than likely stain your bag.

Strawberry Rhubarb Swiss Meringue Buttercream
It was my friend Briana's Birthday recently and I wanted to make something that said "Bri". We do all of our "old lady" things together, like knitting, canning, pickling and so on. Bri had given me some delicious Vanilla Rhubarb preserves that she had made (from her own backyard) and I wanted to put that into the icing. I was a bit short on what the recipe called for so I puréed up some fresh strawberries and mixed those in too. The outcome was once again, the best icing I have ever made. There were no cupcakes left and they were all gone before everyone was even at the party. I used a boxed cupcake again for these as I was in a bit of a time crunch and didn't have enough Eggs to conquer some Anna Olson Vanilla cupcakes. Next time though... Here's the modified recipe from the Strawberry Jam Buttercream I made earlier this year.
Strawberry Rhubarb Swiss Meringue Buttercream
(Adapted from Martha)
Ingredients:
4 large egg whites
1 1/4 cups sugar
1 1/4 cups unsalted butter, room temperature, cut into tablespoons
1 teaspoon pure vanilla extract
1 cup Rhubarb Preserves
1/2 Cup Puréed Strawberries
Directions:
In the heatproof bowl, either of an electric mixer or you can transfer it after, set over a saucepan of simmering water, combine egg whites and sugar. Cook, whisking constantly, until sugar has dissolved and mixture is warm to the touch (about 160 degrees). I have never been able to get mine to 160. I usually top out about 145º. I also wouldn't whisk this by hand if you don't have to. Your arm will be sore. I used my little hand beater and it still took about 10 minutes to get to 145º and fluffy.
Transfer or Attach the bowl to the mixer fitted with the whisk attachment. Beat the egg-white mixture on high speed until it holds stiff (but not dry) peaks. Continue beating until the mixture is fluffy and cooled, about 6 minutes.
This is where it starts to get a bit tricky, I was really lucky this time as it came together great.
Switch to the paddle attachment. With mixer on medium-low speed, add butter several tablespoons at a time, beating on medium high after each addition. Do not add more butter until the all incorporated (If frosting appears to separate after all the butter has been added, beat on medium-high speed until smooth again, 3 to 5 minutes more.) Beat in vanilla. Beat on lowest speed to eliminate any air bubbles, about 2 minutes or stir with a spatula by hand.
Stir in jam and purée with a rubber spatula until frosting is smooth, mine looked a little curdled after this part so I put the bowl back on the mixer and mixed with the whip attachment for about a minute on medium high and it came back together. If you have more problems, this link should help you out!
I piped these pretty high, I had 18 cupcakes and still had enough to pipe them all this high and cover half an Angel Food Cake (which I had left over, delicious). I used my large star tip (1M) piped the bottom layer and then did the extra swirl on the top.

Sunday, December 15, 2013
Skinny Peanut Butter Cup Mini Cheesecakes
My friend Shannon wanted a cheesecake for her birthday, no problem! That's my kind of birthday gift. She was pretty jealous of one a made a while ago on full scale with Reese's PB Cups in it so I decided to go that route but to cut it down a little bit calorie wise. I found this recipe on Pinterest (obviously!) and loved it instantly. It needs to be chilled overnight to get to the right consistency of cheesecake, otherwise it definitely tastes a little like the light cheesecake it is. I made this into 6 mini cheesecakes so it didn't need to cook as long. The mini's are easier to share and to split up - because I obviously wanted one for myself!
Skinny Peanut Butter Cup Cheesecakes
(Adapted slightly from here)
Ingredients
2/3 cup chocolate chip cookies, crushed
2 cups fat free cottage cheese
1 (8oz) package light cream cheese
3/4 cup coconut palm sugar (Or brown sugar)
1/2 cup sugar
1/2 cup fat free sour cream
1/4 cup flour
2 tsp vanilla
2 eggs
2 egg whites
1 bag mini peanut butter cups, chopped (reserve a couple for garnish if desiered)
Instructions
Preheat oven to 300 degrees.
Line a 9 inch baking pan with foil, and spray with nonstick spray.(I used my 6 mini cheesecake pan and skipped the foil)
Press the cookie crumbs into the pan, pressing down with a glass to get an even compact crust.
Add cottage cheese and cream cheese to a food processor. Process until smooth, about 2 minutes.
Add brown sugar, sugar, sour cream, flour, vanilla, egg, and egg whites. Pulse until just blended. Fold in 3/4 of chopped peanut butter cups.
Pour over graham cracker crumbs.
Bake for 1 hour or until almost set on top, it took about 45 minutes in the mini pan. Turn off the oven, and let cheesecake set in there for 1 hour with the door closed. Remove from the oven and cool.
Cover and chill overnight, covered in the fridge.
To serve garnish with the remaining peanut butter cups, and chocolate sauce if desired.

My Birthday Tea Party
I really wanted to do "High Tea" for my birthday. I vetoed the Fairmount, solely because for $50 a person we could have a super awesome one at someones house with a lot more champagne! So my "control freakness" took over and I made a little menu. Everyone picked a sandwich (crustless on white of course) and brought a bottle of bubbles. I did all the baking, because its kind of what I do, my friend Alex made mini Quiches that were wonderful. I really didn't think I liked those until recently.
I was really happy with how it all turned out. My mom had a classic tea set for us to use and we even had some real tea between the Champagne. Morgan (our hostess), bought some Birthday Cake tea for use to enjoy - it was so good! And it had sprinkles in it. So here's some recipes for the baking, a copy of my menu and some pictures. I hope it inspires you to dress up and have one of your own. Fascinators optional, but so much fun!


I was really happy with how it all turned out. My mom had a classic tea set for us to use and we even had some real tea between the Champagne. Morgan (our hostess), bought some Birthday Cake tea for use to enjoy - it was so good! And it had sprinkles in it. So here's some recipes for the baking, a copy of my menu and some pictures. I hope it inspires you to dress up and have one of your own. Fascinators optional, but so much fun!

Cream Scones
(Adapted from here)
Ingredients:
2 cups all-purpose flour
1/4 cup granulated white sugar
2 teaspoons baking powder
1/4 teaspoon salt
1/3 cup cold unsalted butter, cut into pieces
1 large egg, lightly beaten
1 teaspoon pure vanilla extract
1/2 cup heavy cream (35%)
Glaze:
Heavy cream
Directions:
Preheat oven to 375F and place the rack in the middle of the oven. Line a cookie sheet with parchment paper.
In a large bowl, whisk together the flour, sugar, baking powder and salt. Cut the butter into small pieces and blend into the flour mixture with a pastry blender or two knives. The mixture should look like coarse crumbs.
In a small measuring cup combine the whipping cream, beaten egg and vanilla. Add this mixture to the flour mixture. Stir just until combined. Do not over mix.
Sprinkle flour on a mat or clean counter and knead dough gently four or five times, adding a touch more flour if needed. The more you add, the heavier the scones with be though. Pat the dough into a circle that is about 7 inches (18 cm) round. Then, using a 2 1/2 inch (6.5 cm) round cookie cutter, cut the dough into rounds. Place the rounds on the prepared cookie sheet, spacing a few inches apart. I got 12 out of the recipe
Brush the tops of the scones with a little cream. This helps to brown the tops of the scones during baking.
Bake for about 15 - 18 minutes or until nicely browned.
These turned out nicely sweet and paired amazingly with Double Devon Cream and Jam. I would make them again for sure. The parchment will help them come out a bit lighter while still being cooked, so if you mind - don't skip that step.

Mini Lemon Poppy Seed Loaves
*Coming Soon

(Fudge courtesy Spruce Meadows Christmas Market)
Citrus Cheesecake in a Chocolate Shell
(Adapted slightly from Here)
Ingredients:
2 cans (11 oz) Mandarin oranges, drained
6 oz cream cheese
4 oz heavy whipping cream
2 teaspoons sugar
1 teaspoon vanilla paste (or vanilla extract)
Dash of Lemon Juice
6 Chocoate Shells (Such at Choco-Lux)
Chocolate Garnish (optional, Choco-Lux)
Beat whipping cream until firm.
Blend in cream cheese, vanilla, and 1 can of the Mandarin oranges.
Gently spoon mixture into chocolate shells, smoothing the top.
Decorate the top with remaining fruit and chocolate garnish if desired.
Chill for 4 hours minimum, covered.
I was really happy with how this turned out, I'm sort of a cheesecake snob and a no bake was pushing it for me but I really liked the chocolate shell idea, so I had to go that way. I thought mandarin was a good flavour to go with for the season since we already had lemon loaves. I added a touch of sugar and used the vanilla paste because I like the little bits of vanilla bean in there. I also upped the cream cheese to help it stand a bit better and saved some whipped cream for the tops to decorate. I would make this again for sure.

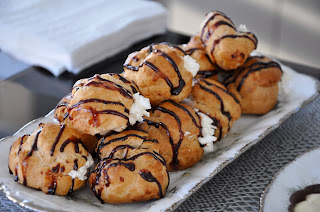
Profiteroles with Chocolate Drizzle
I stuck with the cream puff recipe I made for Thanksgiving except made them a bit smaller. I added a little more egg than last time and was worried they weren't going to turn out, but they actually raised and puffed out way better than the last ones. I waited to fill them until about 30 minutes before the party and let the chocolate set in the fridge for a bit as well. I used St Dalfour Chocolate Raspberry dessert sauce for the drizzle, but any type of melted chocolate or caramel would work. What ever you want!

And that does it for the tea party. It was so much fun, there was a lot of food. We definitely didn't eat it all but had our fair shares with leftovers for the men that didn't get an invite.

Thursday, December 5, 2013
Spicy Maple Kettle Corn
One of the many cooking shows that I watch on a fairly regular basis is In the Kitchen with Stefano Faita. I like it because he's always excited to be cooking and he likes butter. Plus its Canadian. So at least everything they're using, I can actually get. Also, he makes a lot of really great snack type food which helps to get Sean to be ok with watching the show once in a while. I made this (A double batch) for our Halloween Party, just over a month ago.
I thought it turned out really great. Some people thought it was a bit too spicy. So make sure you only do the Cayenne to your audience, or no one might eat your awesome snack! Another thing I would recommend is to use a thermometer. I managed to over toast my sugar in the second batch even with the digital one, but its not a candy one that you can leave in the pot. If the sugar gets over cooked it can break the popcorn apart or worse you might need to start over - burnt sugar doesn't make any friends. I left the nuts out, but I might put pecans in it if I made this again. You can pop the popcorn however you usually do, I've found stovetop with peanut oil has been the nest luck for me so far. I would also do unsalted and salt the final product before the oven if desired.
Spicy Maple Kettle Corn
(Adapted from Stefano)
8 cups popped popcorn
1 1/2 cups unsalted nuts (optional)
1 1/2 cup pretzels
3/4 cup real maple syrup
1/4 cup corn syrup, white or golden
1/4 cup butter (unsalted)
Sea salt or kosher salt, to taste
Cayenne, to taste (I used about a heaping teaspoon)
Preheat oven to 300 degrees F. I sprayed my roasting pan lightly with pam instead of parchment.
Combine popcorn, nuts and pretzels in large bowl or roasting pan. Set aside.
Over medium heat, bring maple syrup and corn syrup to a boil and cook to soft ball stage (240 degrees F.). Add butter, salt and cayenne pepper.
Carefully pour the maple caramel mixture over popcorn and toss with wooden spoon or tongs to combine. Bake, mixing every 8 to 10 minutes, until caramel hardens on popcorn, about 30 minutes.
Let cool completely. Store in airtight container.
Peanut Butter Chocolate Swirl Cookies
As with most of my recipes I found this one online. I follow the Williams Sonoma "Taste Blog", which I would highly recommend if you're ever considering a dinner party, and this was their featured cookie of the day. Sean (and his whole family) love peanut butter. Anything peanut butter. And if you throw chocolate in there you get a gold star. So I knew these would be a great choice for some cookies to have out at one of our many get together's over the next few weeks.
It wasn't as easy as I was hoping for but nothing that ends up that great usually is. The hardest part for me was chocolate spreading - melted chocolate on cooled dough. I didn't get it quite right, which messes with the rolling if you have too much chocolate in there. The rolling up wasn't too bad, but I would suggest using waxed paper instead of parchment. The dough is quite soft and sticky. The only other things I had to change were adding a few more chocolate chips to the melt - about 1/4 cup more and they needed to be baked for about 2 minutes longer I found. But my mom made them in her convection oven and the 10 minutes was perfect. So here's the recipe (and a picture soon!) I hope you give these a try and impress your guests with them!
Peanut Butter Chocolate Swirl Cookies
(Adapted slightly from Williams Sonoma)
1 cup unsalted butter, at room temperature
1 1/2 cups firmly packed light brown sugar
2 large eggs
1 cup good-quality unsweetened creamy peanut butter
1 tsp. pure vanilla extract
2 1/4 cups all-purpose flour
1 tsp. baking soda
1/2 tsp. kosher salt
1 (12-oz.) bag semisweet chocolate chips, plus some extra if needed
In the bowl of a mixer fitted with the paddle attachment, beat all but 1 tablespoon of the butter and the sugar on medium-high speed until creamed and fluffy. Beat in the eggs one at a time, beating well after each addition. Beat in the peanut butter and vanilla until smooth. Sift the flour, baking soda and salt into the bowl, and stir into the peanut butter mixture. Cover the bowl and refrigerate the dough for at least 30 minutes.
Meanwhile, in a heatproof bowl set over a saucepan or double boiler filled with about an inch of water, melt the remaining 1 tablespoon butter with the chocolate chips over very low heat. Stir until smooth. Let cool slightly.
Divide the dough into 2 balls. Place 1 dough ball on a large piece of floured waxed paper. Flour the top of the dough, place another piece of parchment on top, and roll into a rectangle about 10 by 15 inches. The dough should be about 1/8 inch thick. Use the waxed paper to help you, and keep peeling it up and sprinkling it with flour if it gets too sticky. If you keep the dough floured, it will roll out more easily. When you spread the chocolate, brush off any excess flour, or the chocolate will be difficult to spread. Spread the rectangle with half of the chocolate mixture, leaving a 1-inch border on the long side closest to you. Starting from the long side farthest from you, and using the waxed paper to help, carefully roll the dough into a log. Place the log seam side down and wrap it in the waxed paper, twisting the ends to hold it tight. Repeat with the remaining dough and chocolate mixture.
Refrigerate until firm, about 3 hours or ideally overnight.
Space 2 racks evenly in the oven and preheat to 350 degrees F. Line 2 large baking sheets with parchment paper. Unwrap the logs, trim the ends of each log, then cut crosswise into slices about 1/4 inch thick. Space the cookies evenly on the prepared pans. They don't puff out too much, so you can probably get quite a few on the sheet. Aim for about a fingers worth of space between. You will need to bake in batches, so refrigerate the remaining portion of the logs until you are ready to cut and bake more cookies. Bake until the cookies are puffed and lightly golden, about 12 minutes, rotating the pans about halfway through. Let the cookies cool on the pans for 5 minutes, then transfer to wire racks to cool completely.
I made about 85 cookies.

Subscribe to:
Posts (Atom)