This is a recipe I found in Self Magazine. It, of course, was about one of the different diet plans they seem to have every few months. I had most of the ingredients so I figured I'd change it up and give it a try. My adapted recipe is below!
Here's the original recipe:
Serves 1
3 TBSP rice wine vinegar
1 TBSP creamy Peanut Butter
1 TBSP Orange Juice
1/4 TSP Low Sodium Soy Sauce
2 Cups chopped Kale
1 TSP Olive oil
2/3 Cup cooked whole wheat spaghetti
1/2 Cup Cannellini beans
1 TSP Scallions sliced
- Combine the first four ingredients in bowl until smooth. Natural PB works better for this.
- Saute Kale in olive oil until wilted.
- Add spaghetti, beans and peanut sauce.
- Stir until warmed through
- Serve with Scallions.
________________________________
Mostly I just made this dish simpler and to fit what I had. I had a spicy peanut butter in my pantry (Peanut Butter Co) so I used that, which gave it quite a bit of extra heat. It has many different peppers and chilis in it. I used spinach instead of Kale and I didn't use beans or scallions. I did substitute shrimp which I'd peeled and steamed quickly instead. Shrimp was made for peanut satay sauce. Tonight I also used my own pasta that I made in the last post! The home made pasta was amazing. And once I get it all figured out I may never buy pasta again.
Here is my adapted recipe:
3 TBSP rice wine vinegar
1 TBSP creamy Peanut Butter
1 TBSP Orange Juice
1/4 TSP Low Sodium Soy Sauce
2 Cups chopped spinach
1 TSP Olive oil
Mix first 4 ingredients in a bowl or measuring cup
Saute spinach in oil
Add cooked pasta and Sauce, stir until warmed through.
____________________________________
I doubled the recipe and was left with some extra sauce, you could probably do 1.5 times for 2 people, if you don't like it super saucy then just that recipe will be fine for the sauce.
I forgot a picture, because it just looked so tasty. But I'll make it again soon!
Saturday, September 15, 2012
Thursday, September 13, 2012
Fresh Pasta
I think this may be my biggest food related leap of all time.
I'm so excited to make my own pasta though. I bought a hand crank pasta roller at Williams Sonoma this week. It was my 6 months with my boyfriend on Monday so we thought we'd do some dinner on Friday night for it. I'm planning to make a spicy peanut satay sauce on spaghetti type noodles with large shrimp. More on that later! But I thought what could be better than making the pasta myself too?! So I'm going to try it. And if I decide after a few times I really hate it, I'll just use my roller to make perogies. Or upgrade to the kitchenaid attachment. (It was alot more expensive for a noob like myself).
I'll post some pictures of the (what I assume will be) event of making my pasta. As well as all the normal stuff, what I'd change (hopefully nothing, there's 3 ingredients), if I liked it and if I'll manage to do it again. I plan on making it tonight so that if I screw up majorly I won't be as sad about it tomorrow. Here goes.
Step 1
Flour and Eggs and a splash of oil. I used about half and half semolina and unbleached all purpose.

Step 2
Mix with hands until dough forms. This was no where as easy as it looked. Which I should have assumed. I had to add some more liquid. I added some water and oil. Nothing was working. I added another egg. And then some more AP flour. Finally, dough.
You have to let the dough sit at least 30 minutes. Mine was definitely still not elastic enough after that. I let it sit about another hour. 90 minutes total in a sealed plastic bag.

Step 3
Cut the dough ball/lump in half. Roll through the press several times on the largest setting. I did this about 5 times. Folding it over and rotating it each time. From here I went thinner. My Pasta roller has 6 settings. I went from 0 - 4. 0 being the thickest, 4 as thin as I went for my Spaghetti noodles.
Step 4
After it was thin enough I put it through the spaghetti attachment that's included. Then Spaghetti happened!

I'm not at taste yet. I laid it out to dry for a couple minutes, sprinkled it with some extra semolina flour and put it in a large ziplock in the fridge. I hope its amazing. It took too long to not be. I'm sure after you do it a few times it gets easier to figure it out and you find a good recipe. But I can't wait to try it.
Here's the link to the recipe I used and then manipulated to my needs. I think it may have a lot to do with the dryness in Calgary that I had to add so much extra liquid.
Fresh Pasta
Wednesday, September 12, 2012
Baked Two-Cheese Penne with Roasted Red Pepper Sauce
This is a recipe from one of the many cookbooks I have hidden away. I've been meaning to try it for a while but getting out to get the ingredients.
Truthfully, the only thing I needed was fontina cheese. I was horribly disappointed to find Fontina discontinued at my grocery store. I bought one called Red Rouge instead, it's Fontina like. When I got home I was again sad to see for once I didn't have penne. I had macaroni. Good enough!
Here's the recipe below, and underneath that what I ended up thinking.
1 Cup Uncooked Whole-Wheat Penne
2 TBSP Olive Oil
2 TBSP Flour
Salt
Pepper
1 1/2 Cups Milk
1 OZ Gouda (Shredded)
2 OZ Fontina (Shredded)
1/4 Cup Panko Bread crumbs
1/2 Cup Roasted Red Pepper
1 TBSP Greek Yogurt
Heat Oven to 350F
Prepare 8" Baking Dish
Bring water to a boil, add pasta, cook, drain and set aside
Reduce Heat to med, add oil, flour, salt and pepper to taste. Cook 1-2 Minutes until flour browns slightly. Stir in milk 1/2 cup at a time, whisking to ensure smooth. Stir in cheeses until completely mixed and smooth. Stir in cooked pasta.
Transfer to prepared baking dish.
Top with panko and bake for around 20 minutes.
While baking, add the bell pepper and yogurt to a food processor or blender and process till smooth.
Cut pasta into 4 pieces, drizzle with roasted red pepper sauce.
_____________________________________
Ok, the only things I changed were the cheese and pasta cut - as I mentioned.
At first glance I knew that this was not going to cover a 8" Square baking dish. I used a 8x5 and it hardly covered that one.
Also I just roasted my own Red Pepper. If you don't know how to do that - its super simple! I cut a red pepper in half, put on a cookie sheet and broiled it for 3 - 5 minutes. Until the skin is black. Place the pepper in a bowl, cover with stretch wrap and leave it till cool. About 10 minutes. When you take the stretch wrap off the bowl, the pepper should peel easily. I had to add an extra spoon of greek yogurt so it wasn't as runny.
I got this from, "The CarbLovers Diet" book. I like this book. Things are filling and the portions are usually good. It says this recipe is supposed to be 433 Calories/Serving. My calculation was much closer to 300. Sooo I had more than the 1/4 of the recipe. About 1/3. If you make this, you'll see, its not alot. I'd like to think its a mistake, but who really knows. Those counts depend on so many things.
I LOVE the addition of the red pepper yogurt sauce. It freshens it up and adds a whole other layer of flavour.
I'd highly recommend this. But cook it in a smaller dish or add more pasta. It was tasty for sure.
Here's a picture, I know - it doesn't look super appetizing. But it is, I promise.

Pickling
I've had a little surge of inspiration of the past week or so, as long as it keeps up there's going to be so many new recipes up here soon!
Recently, I got invited to a pickling party. I've never done this. I've never had family that's done this. I was super interested. One of those things I may be "supposedly" too young to know how to do. Big Deal.
So I headed to the Farmer's Market with my friend. We bought more "cukes" then I ever thought we'd use, pounds of peeled garlic, beans, chili's, lemons and asparagus.
I may not have had the full pickling experience. I bought some cute, tall, Weck jars from Williams Sonoma and dropped them off with my friend. She did all the sanitizing, boiling, brine making and sealing. I stuffed jars mostly. (I was so impressed at my beginner jar stuffing skills. I got 2 pounds of cukes into one jar... it was a big jar. BUT it happened.) But I think I understand the jist of it.
My friend was kind enough to share the brine recipes we used for the pickles and asparagus/beans. Here they are below!
Pickles:
Rose’s Dill Pickles (My Friends Great Grandmother- you're welcome)
step 1 - sterilize jars
step 2 - wash cucumbers in cold water
step 3 - put large sprig of dill in jar
step 4 - two - three cloves of peeled garlic in jar
step 5 - pack cucumbers in jars, bigger on bottom, smaller near the top
step 6 - put large sprig of dill in jar (top)
step 7 - two-three cloves of peeled garlic in jar (top)
step 8 - small bay leaf
step 9 - optional red pepper
step 10 - 12 cups water, 3 cups vinegar, 1 cup “pickling salt”
bring brine to boil, boil for 1-2 minutes, fill jars
Pickles are technically ready after one week, but taste better after one month!
__________________________________
And here's the link for: Spicy Asparagus & Beans Brine
And a picture!

Tuesday, September 11, 2012
Jalapeno Cheddar Rolls
*Updates*Below*
I saw these on one of the cooking blogs I follow regularly, and I had to make them asap! The only thing I needed was some Jalapenos, so after a trip to the store I made them right away.
I added more cheese and an extra Jalapeno. I knew that these weren't going to be that spicy with the ribs and seeds removed and I wish I had stuck to my gut and left a few ribs in. To me they didn't have much Jalapeno or Cheddar flavour. But I will try again! The other thing that concerned me a little was there was no direct yeast proofing step. They did rise, but I expected a bit more.
The recipe also said to cook 25 minutes. I had to cook these for almost an hour, 55 minutes, in my non convection oven.
Kitchen Tip: I preheat my oven to as low as it will go, about 170 F. When its heated I turn it off and let it sit with the door open a couple minutes. I then put my dough that needs to be risen into this now warm oven. The amount of rising you will get vs on your counter is incredible! Always make sure you cover it with a damn towel or stretch wrap or it'll get a bit crusty this way.
Don't get me wrong, as is, these are great - and almost gone. Here are the things I'm going to try next time.
- I will only remove half of the ribs, but still all the seeds. OR dry the jalapenos slightly under the broiler to help add some heat.
- I'm also going to proof my yeast in the warm water with the sugar and then mix in to the dough. I don't know how much of a difference it will make but it seems worth a try.
_________________________________________________
Ok, I had a bunch of Jalapenos left over from making Jalapeno Jam (still working on those posts) so I figured I could give these another try, with my changes of course. There's a serious victory to being right about something. It probably made me jump happily up and down a little. But the only one here was my dog, so you'll never know.
I used 3 peppers this time, but removed seeds and ribs from one and kept them in the other two. Minus the ones that fell out. I also added a bit more cheese. Probably about 1/6 of the 700g block each time. I doubled the recipe again.
I proofed my yeast. I had no idea if this would make a difference or if it would just be some wasted time so why not? To do this I added 1 TBSP (of the 3) of the sugar to the hot water and sprinkled the yeast on top. While this sat for 5 minutes or so I combined the rest of the recipe as directed. Complete with the other 2 TBSP of Sugar. I wish so badly that I had taken a photo of what the risen dough looked like last time. I sure did this time! I had the same amount of dough in 2 different sized oiled bowls. THIS is what risen dough should look like. The one is touching the stretch wrap! I got 22 buns vs the 17 I got last time because there was just so much more air. I once again used my method to letting the dough rise in the warm oven.
I wasn't going to do the egg wash this time but I regretted it instantly when I took them out to switch their places in the oven (bottom to top, half way) so I quickly added it on since they had at least another 15 minutes left.
These only took 30 minutes to cook this time, compared to 55 last time.
They don't look much different after they're done. They're lighter and fluffier than my last ones and are a bit bigger.
Jalapeno Cheddar Rolls
(Adapted slightly from Jalapeno Cheddar Rolls)
1 3/4 teaspoons instant yeast
3 1/4 cups all-purpose flour
3 tablespoons sugar
1 teaspoon salt
6 oz sharp cheddar cheese, shredded
3 large jalapeños (seeds and ribs removed), finely chopped
1 cup water water (100-110 F)
2 tablespoons canola oil
2 large eggs, at room temperature
I added 1 TBSP (of the 3) of the sugar to the hot water and sprinkled the yeast on top. While this sat for 5 minutes or so.
While this is sitting - Add the flour, remaining sugar, salt, cheese and jalapenos to the bowl of a stand mixer fitted with the dough hook. Beat briefly on low speed to combine. In a measuring cup, whisk the water, oil and 1 of the eggs together until combined. With the mixer on low, slowly add the wet ingredients and continue mixing until the dough comes together (you may need to scrape down the bowl once or twice). The dough should clear the sides of the bowl and cling to the bottom - you may need to add a little flour or water to achieve the right consistency (every time I've made this recipe I've needed to add 2-4 tablespoons of flour). Knead the dough on low speed for about 5 minutes, or until smooth and elastic.
Spray a large bowl with nonstick cooking spray. Shape the dough into a ball and place in the bowl. Cover with plastic wrap and let the dough rise for 75-90 minutes, or until doubled in size. ** See kitchen tip
Preheat oven to 350 F. Line a baking sheet with parchment paper.
Transfer the dough to your work surface and divide in half. Divide each of the two pieces into 4 or 5 equal pieces, depending on whether you want oversized or more traditional rolls. Shape each piece of dough into a ball and place on the prepared baking sheet, then flatten slightly with the palm of your hand. Space the rolls about 1/2 to 1-inch apart - you want the edges to bake together in the oven.
Cover the pan with a damp towel, and allow the rolls to rise for 35 minutes. Meanwhile, whisk the remaining egg with 1 tablespoon of water to make egg wash. Brush the rolls with the egg wash. Bake for about 25 minutes, or until the tops of the rolls are deep golden brown.
Transfer the pan to a wire rack and let the rolls cool for at least 15 minutes. Store in a resealable plastic bag at room temperature, or wrap tightly and freeze.
Makes 8-10 rolls
Here's the dough picture:

Here's the final Product!

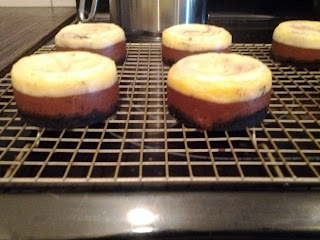
Mini Cheesecakes
I have a bit of a cheesecake obsession. I'm always looking for a new one. Recently I've had a couple occasions (excuses) to make some mini cheesecakes. These are my favourite. Since they're rich you can split one, but if you have a whole one its not so bad...
The first one, with berries on top was for meeting my boyfriends Mom, around her birthday. I hoped it would help me out a little.. AND it did :)
The second one was to celebrate a nice raise at work. Who doesn't deserve cheesecake??
I have a mini cheesecake pan that makes 6 cheesecakes. I always follow the recipe on the pan pretty closely for amounts, but I'm pretty sure a 9-10" cheesecake would make the same amount. The saddest part about this post is that Williams Sonoma no longer carries this pan. I'm sure you can find something like it somewhere though. Bed bath and beyond always has fun pans!
Here's the recipe and then another one I modified a bit to make chocolate swirl cheesecakes. I always use either all light cream cheese or at least half light and half regular.
Recipes:
Crust:
5 TBSP Butter, Melted
8 Graham Crackers (140g), Crumbled
2 TBSP Sugar
Filling:
500 G Cream Cheese, cut into cubes - Room Temp
3/4 Cup Sugar
1.5 TSP Salt
2/3 Cup Cream
2 Eggs
Set oven to 325F
- Pulse crust ingredients in food processor until it starts to stick together.
- Divide evenly among Cakes
- The recipe said to use your fingers but I found that the bottom of glass worked perfectly
- Pre bake the crusts for about 10 minutes or until set.
Lower the Oven Temp to 300F
- The recipe suggests using a food processor to cream all the ingredients together, this or a mixer will work fine!
- Mix the cream cheese first until smooth, then add the other ingredients.
- Mix till well blended.
- Divide the filling between the cakes, about 2/3 cup in each
- Bake the cheesecakes until the edges are set but the middle is still slightly wobbly. 48 - 52 minutes.
- I don't have a convention oven, I found they took about 55 - 60 minutes
- Transfer to a wire rack (still in pan) and let cool for 2 hours.
- Push cheesecakes out of pan and remove from disks. Transfer to parchment lined sheet and refrigerate for at least 4 hours, or up to 2 days.
______________________________
The things I changed the second time:
- I used Oreo crumbs
- I used all light cream cheese (I usually use half light and half full fat)
- 1% Milk instead of cream
- I melted 1/4 cup semi-sweet chocolate chips and added it to half of the cream cheese mixture
- I poured the chocolate on first, the regular cheese mixture on top
- I attempted swirling with a wooden skewer
- I also used a water bath, a brownie pan filled 3/4 with water in the over at the same time.
- I left the cheesecakes in the oven after it was off for about an hour
These were the best looking cheesecakes I ever made, they didn't crack or fall at all.
______________________________
My cheesecakes have a tendency to fall and crack without a waterbath so I covered these with berries and made a chocolate drizzle.They were well loved... And no one saw the cracks!
My Chocolate swirl cheesecakes didn't quite swirl, I was afraid I'd disrupt the bottoms. But they still turned out great. They had a waterbath, well a brownie pan underneath.


Wednesday, September 5, 2012
Blueberry Greek Yogurt Pancakes (With Sprinkles!)
Let me just start by saying that these are the best pancakes I've ever made. Maybe ate. I was sceptical of the greek yogurt in them. But sprinkles = fun so my skeptisim went away. I found them through twitter, I follow Kitchen Magpie (You should too). These are definitely the best thing I've seen and made from twitter.
I had all the ingredients, except cream - so I substituted milk. I also used no fat greek yogurt, as its what I had in my fridge. Made me feel like they certainly weren't the worst thing I could be eating in the morning. I added some sprinkles to the batter bowl and sprinkled some on the pancakes as they were cooking, definitely the best part. If you have pancake molds, these pancakes were perfect for them. Since the batter is super thick (like a cake), it stays in form. We found these were actually better without syrup because they had such good flavour.
I cooked mine on a well (breakfast) seasoned cast iron griddle, so they turned out a bit darker then I would have liked. But thats the risk of cast iron. Anyone that knows me, knows that I'm obsessed with Le Creuset. But they turned out great. I will definitely make these again. And they made enough for 4 (like the recipe says!) which means my boyfriend and I got them two days in a row!
Heres the link and a photo!
Blueberry Greek Yogurt Pancakes

Subscribe to:
Posts (Atom)